Once you create an account you’ll see the credit applied:

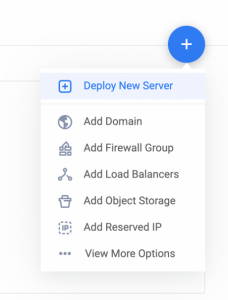
Next. we’ll select the Deploy New Server option:
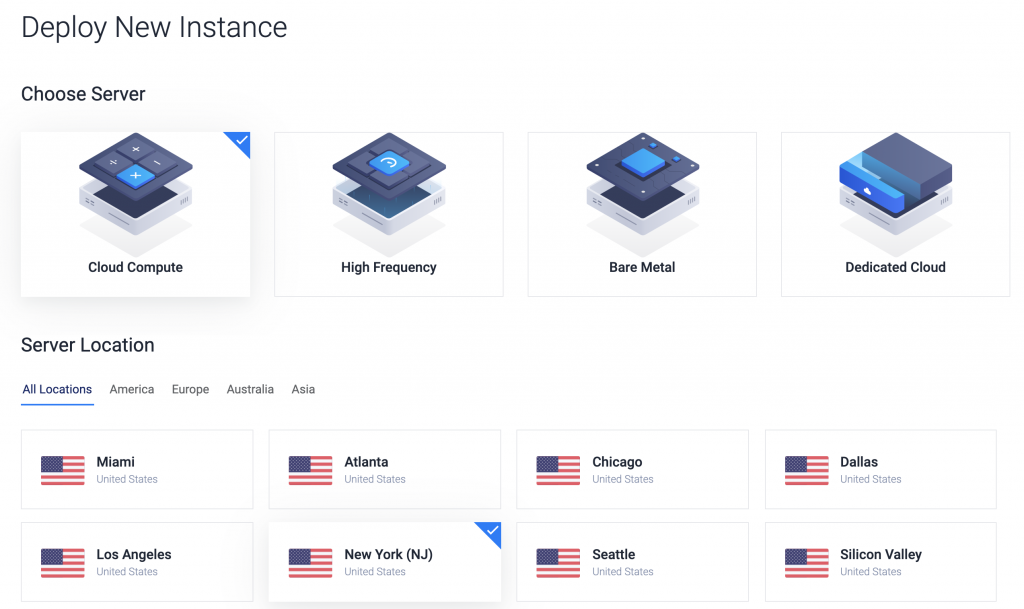
Select Cloud Compute & Choose the Location you’re physically closest to (reduces lag)
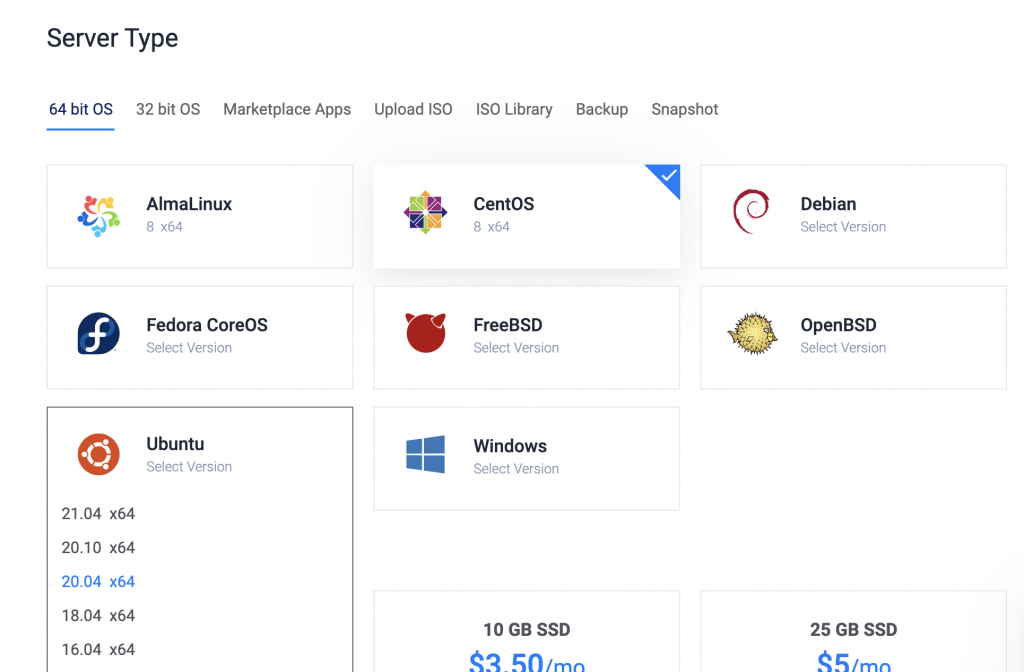
Select Ubuntu 20.04 (64-bit)
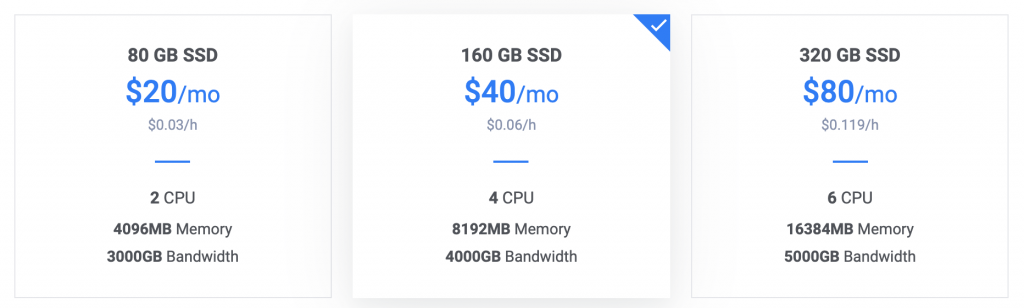
We need a minimum of 4 CPU, 8GB RAM, and 160GB HDD. Select the option indicated:
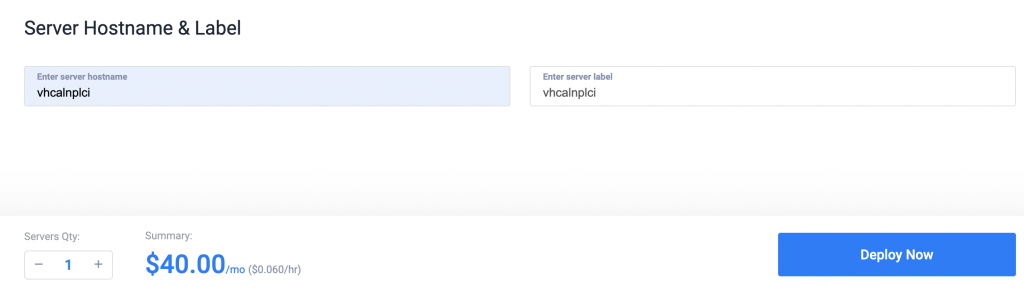
Set the hostname to vhcalnplci and deploy server
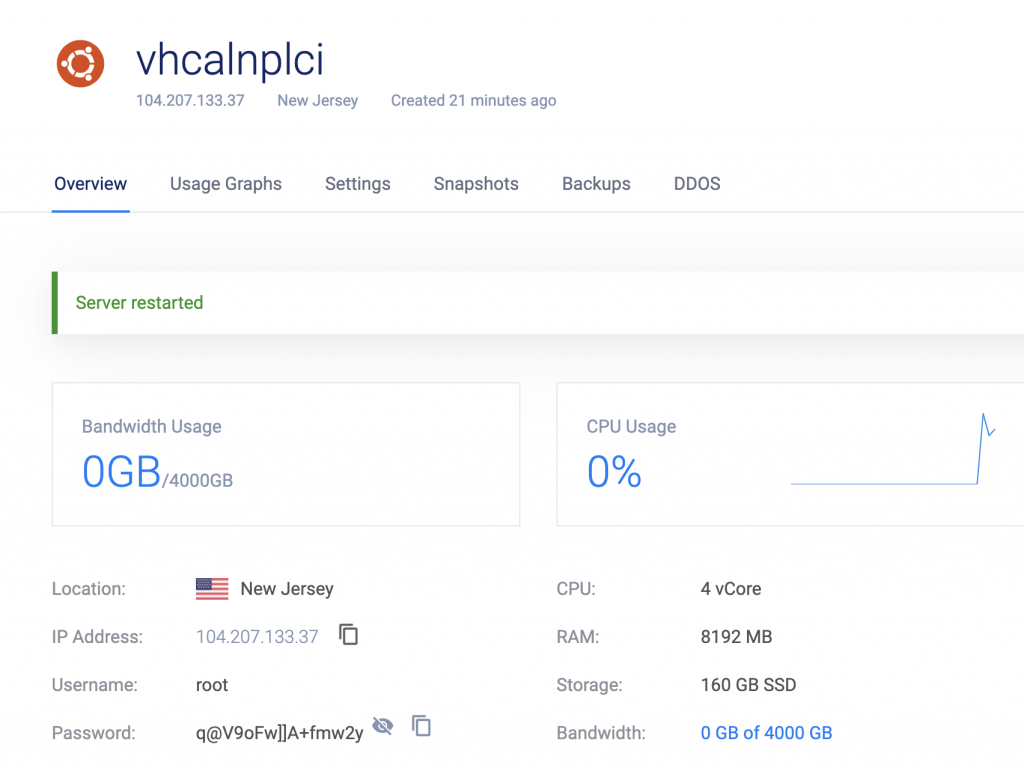
Wait at least 10 minutes for server to come fully online. Once that time has passed, Click on the Server Name

If you see a message that your server is still coming online, please be patient and wait a few more minutes.
Now, give your server a quick restart:

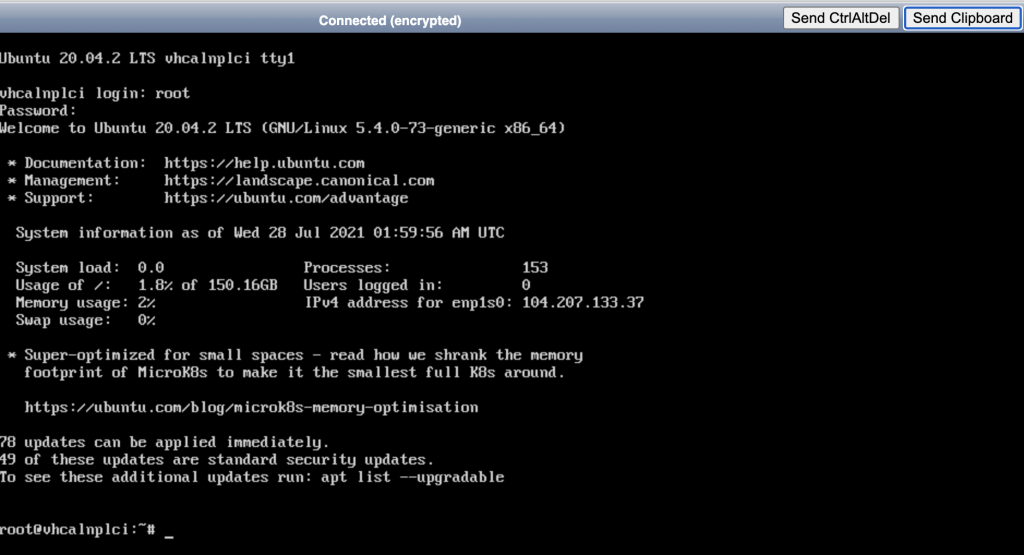
Once the restart is complete, click the monitor icon at the top of the screen to View Console

Login with Username root

You’ll find your root password within your server details:
Once you see this screen, you’re ready to begin server config:
Downloading SAP and Preparing for Installation
Execute each line in the console one by one (copy each line and paste using the send clipboard button in the console). If you have issues copying and pasting, please use Putty or the Mac native terminal to ssh into the server.
hostnamectl set-hostname vhcalnplci

apt-get update -y

cd /

mkdir sap752

cd sap752

wget --no-check-cert https://dl.dropbox.com/s/oy34p1mjli8avn3/sap752sp04.zip

apt-get update -y

apt-get install zip unzip -y

unzip sap752sp04.zip

apt-get install csh -y

apt-get install libaio-dev -y

apt-get install uuid -y

sudo service uuidd start

chmod +x install.sh
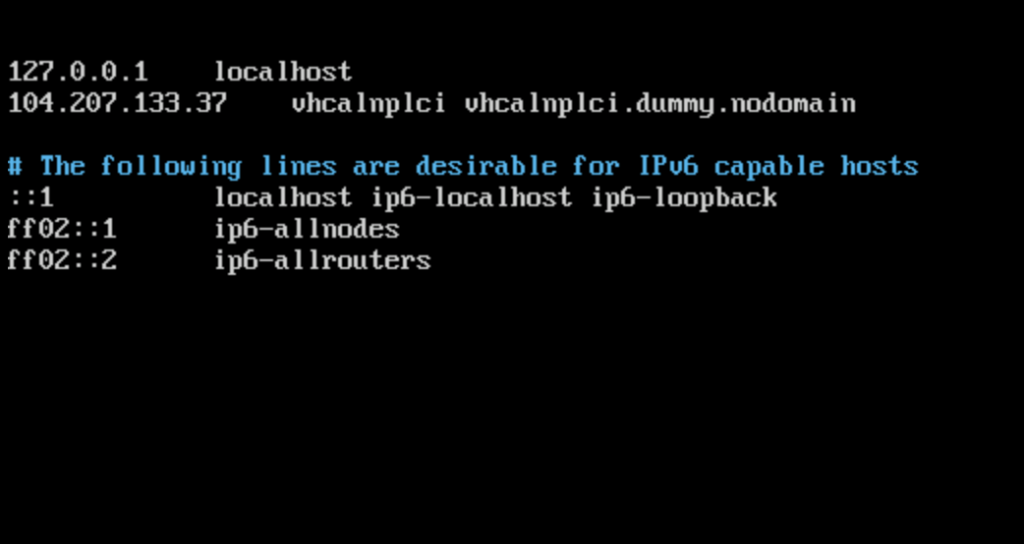
One more step before we can install SAP. Edit the hosts file to reflect our servers IP.
sudo nano /etc/hosts
Update the following lines in before with the after (See picture below)
Before: 127.0.1.1. vhcalnplci
After: your.server.ip.address vhcalnplci vhcalnplci.dummy.nodomain
Type cntrl + x and select y and enter/return key to save
Install SAP
You’ve configured your server, downloaded the SAP installer, unzipped it and set up your hosts file to reflect your server IP. Now we can begin the install!./install.sh
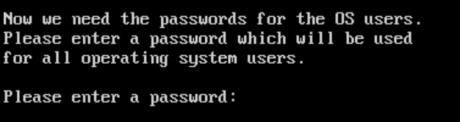
Type yes to agree to the terms and set a password (needs to be complex or install may fail). You’ll need to use one that only contains upper and lower case letters and numbers and is at least 7 characters long. Do not use any special characters, just letters and numbers and it should work.
The install will commence once the password is accepted. Please note that because SAP is still serving up an expired license in their installation package the install will ultimately fail.
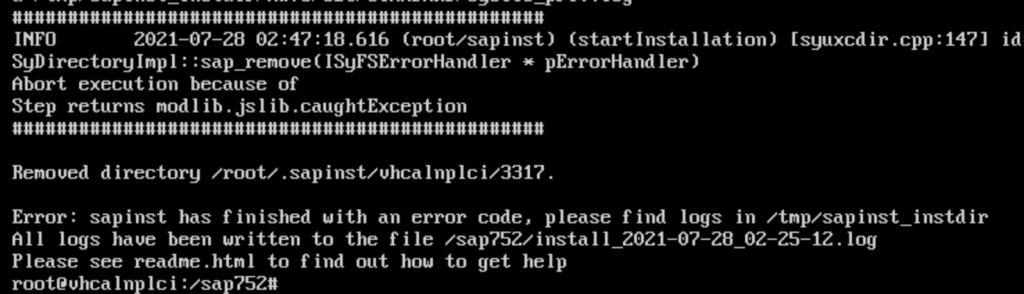
Once the failure occurs, we can copy the new license over and re-run the install. Copy & Paste this code:cp /sap752/License/SYBASE_ASE_TestDrive/SYBASE_ASE_TestDrive.lic /sybase/NPL/SYSAM-2_0/licenses
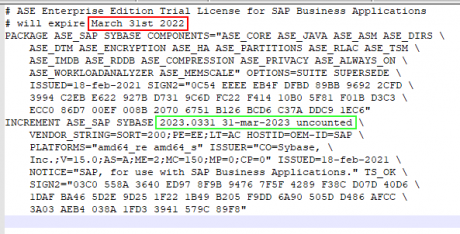
The above license is good through March 2023. I’ll update this file when SAP releases a newer version. Here’s an excerpt from within the .lic file that shows the license expiry date as end of March 2023 even though SAP mislabeled the header highlighted in red.
Restart the installation (you’ll need to reenter a password):./install.sh
Download and Install SAPGUI
— Download SAP GUI 7.52 —
Once the downloads complete, right click and extract all (or unzip). Once the extraction completes, open the folder and navigate to the setup file: …PRES1 > GUI > WINDOWS > WIN32 > SetupAll.exe
Add SAP connection in SAPGUI
Open SAP Logon and add a new connection. The description can be whatever you’d like but Application Server must be your Ubuntu server IP address:
Description: You can call this whatever you want
Application Server: This is your Ubuntu server IP address; e.g. 121.104.102.112
Instance Number: 00
System ID: NPL
Click finish and double click on the connection you just created to connect.
Log on to SAP
The first time we log on to SAP we’ll be using the SAP* user and Down1oad password in SAP client 001. SAP* is the SAP administrator account that has access to configure pretty much everything from a system/access perspective, however, this account does not have the ability to create programs or develop in BW. For those development related tasks you’ll need to log into SAP with the DEVELOPER account. A complete listing of SAP accounts can be found in the tables below:
The installed system provides the following SAP users in client 001:
| User name | Password | Description |
| DDIC | Down1oad | Data Dictionary User |
| SAP* | Down1oad | SAP Administrator |
| DEVELOPER | Down1oad | Developer User |
| BWDEVELOPER | Down1oad | Developer User |
The installed system provides the following SAP users in client 000:
| User name | Password | Description |
| DDIC | Down1oad | Data Dictionary User |
| SAP* | Down1oad | SAP Administrator |
Update SAP License
Log into SAP client 001 using user SAP* and password Down1oad
Now that you’re connected to SAP, navigate to transaction SLICENSE. Delete the existing license and navigate to go.support.sap.com/minisap. Locate the NPL – SAP NetWeaver 7.x (Sybase ASE) radio button. Click the radio button and scroll down entering your information along with the most important part from SLICENSE, your Hardware Key. Accept the license agreement and click generate. A file called NPL.txt will download to your machine and you’ll need to go back to SLICENSE to install this NPL file you just downloaded. Repeat this step every 90 days.
BW Configuration
Update windows hosts file
SAP recently moved some BW functionality out of SAPGUI onto a web browser. In oder to configure SAP and your browser you’ll need to navigate to:
C: Windows > System32 > drivers > etc > hosts
You won’t be able to modify the hosts file unless you first right click on the file and update the properties related to security. Ensure this file has full access to be updated from the security tab. Once that’s done, open the hosts file in a text editor / notepad.
Add the same line from the earlier step to this hosts file as well:
your.ip.address vhcalnplci vhcalnplci.dummy.nodomain
Activate BW objects:
Log out of SAP* and log in as developer. Go to transaction RSTCO_ADMIN. Click on the button Start Installation. If you’d like, you can monitor the job within transaction SM37. The activation job should run 15-30 minutes.
When this job completes you’re good to go! Have fun developing in SAP or SAP BW.
Troubleshooting & Starting and Stopping SAP
Starting SAP:
Log onto your Ubuntu Server and type
su npladm
Type in your SAP admin password you set during the SAP installation.
Your terminal window will change and you’ll now be using the npladm user. To start SAP type:
startsap all
Stopping SAP:
stopsap all
You’ll need to manually start SAP this way if you ever restart your ubuntu server